Your wedding stationery is one of the first impressions your guests will have of your big day. It sets the tone, reflects your wedding theme, and provides essential details about your celebration. Creating your own DIY wedding stationery is a fun, cost-effective way to add a personal touch to your wedding while making each piece uniquely yours. Whether you’re planning a small, intimate wedding or a grand celebration, DIY wedding stationery lets you showcase your personality in every detail. Here’s a guide to crafting beautiful, custom stationery that’s perfect for your special day.
What Is DIY Wedding Stationery?
DIY wedding stationery refers to creating or customising your wedding cards, invitations, and other paper goods yourself. This not only allows you to save money but also gives you the creative freedom to design stationery that perfectly matches your wedding theme, colours, and style.
Types of DIY Wedding Stationery
From save-the-date cards to thank-you notes, wedding stationery includes several key elements that help you stay organised while elevating your wedding’s overall aesthetic. Let’s explore the most common types of wedding stationery and how you can personalise them.
1. Save the Date Cards
Save the date cards help your guests mark their calendars early. They’re great for highlighting your wedding theme or season. DIY save-the-date cards could feature floral designs, minimalist typography, or even travel-inspired motifs for a destination wedding. These cards offer endless creative opportunities to wow your guests right from the start.
2. Wedding Invitations
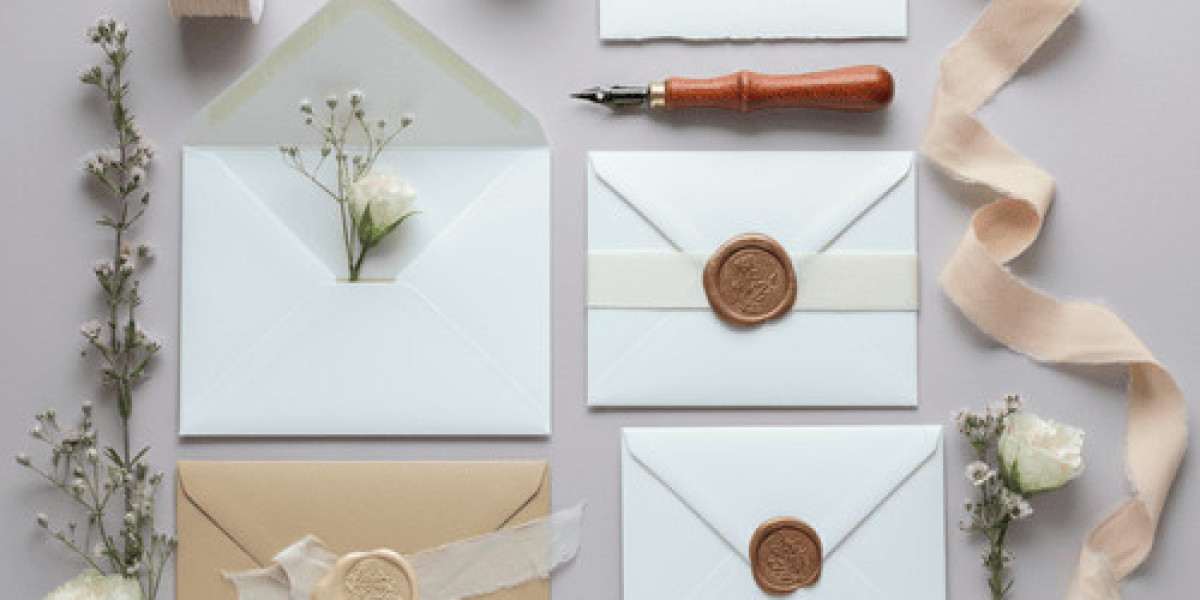
Wedding invitations are the centrepiece of your stationery suite. Flat invitations work well for modern, clean designs, while folded cards can include additional details like maps, schedules, or QR codes for RSVPs. With DIY wedding invitations, you can experiment with embellishments like gold foil, ribbons, lace overlays, or hand-painted touches to make your invites truly unique.
3. RSVP Cards
RSVP cards help you keep track of your guest list with ease. DIY RSVP cards allow room for creativity—add prompts for meal choices, song requests, or even advice for the happy couple. Paired with matching wedding envelopes, they create a cohesive, polished look.
4. Order of Service Cards
Order of service cards are must-haves for religious or formal ceremonies, helping guide guests through the day’s events. With DIY options, you can personalise the text, match your wedding colours, and reflect your ceremony traditions while keeping everything on-theme.
5. Place Cards
Place cards serve a dual purpose: guiding guests to their seats while adding to your table décor. DIY place cards can be as simple or elaborate as you like. Add calligraphy, watercolours, or dried flowers to match your wedding aesthetic and make the tablescape extra special.
6. Menu Cards
Menu cards elevate the dining experience by showcasing your carefully curated dishes while enhancing the table décor. DIY menu cards could include wax seals, illustrated food designs, or even a personal thank-you note for your guests.
7. Table Numbers
Table numbers help guests find their seats and can double as stylish table décor. DIY table numbers can be made using rustic wood, acrylic blocks, floral embellishments, or any material that fits your wedding theme.
8. Thank You Cards
Thank-you cards are a heartfelt way to show your appreciation to your guests after the wedding. DIY thank-you cards give you the chance to add personal touches, such as handwritten notes or a photo from your wedding day, to make them extra meaningful.
9. Information Cards
For destination weddings or multi-day events, information cards are essential for sharing travel tips, accommodation details, or local attractions. DIY information cards can be both functional and visually stunning, keeping your guests informed while staying on theme.
10. Belly Bands
Belly bands hold your invitation suite together and add a touch of sophistication. DIY belly bands can feature metallic accents, custom monograms, or textured paper to tie everything together beautifully.
Creating your own wedding stationery comes with numerous advantages beyond the joy and satisfaction of crafting. Here’s why DIY might be the perfect option for you:
6 Reasons to Create DIY Wedding Stationery That Will Save You Time and Money
DIY wedding stationery is a growing trend among couples who want to add a personal touch to their big day while staying within budget. By creating your own wedding invitations, save-the-dates, and other stationery, you can save money, personalise every detail, and make your wedding truly unique. Here’s why DIY wedding stationery is worth considering and how to get started.
1. Save Money on Wedding Stationery
Wedding stationery can be expensive, especially when ordering bespoke designs from professional suppliers. DIY wedding invitations, place cards, and menus allow you to cut costs by sourcing your own materials and assembling everything yourself. This way, you can stick to your wedding budget while still creating beautiful, high-quality stationery.
2. Customise Every Detail
With DIY, you have complete freedom to personalise your wedding stationery. Choose the colours, textures, and embellishments that match your theme, and design details that reflect you as a couple. From selecting premium paper to adding handmade elements, you can ensure everything fits seamlessly into your wedding vision.
3. Stand Out with Creative Designs
DIY wedding stationery lets you think outside the box. Incorporate hand-drawn designs, meaningful quotes, or unique artwork to create stationery that stands out. You can even add personal touches like photos or calligraphy to make your wedding invitations truly one-of-a-kind.
4. Add a Personal Touch
Your guests will notice the effort and care you put into your DIY stationery. Creating something handmade adds warmth and a personal connection to your wedding. It’s a simple way to make your guests feel appreciated and set the tone for your special day.
5. Bond with Loved Ones
Making DIY wedding stationery can be a fun bonding activity for you and your friends, family, or bridal party. Gather your loved ones to help assemble invitations, cut menus, or tie together place cards. Not only will you save time, but you’ll create lasting memories in the process.
6. Stay Flexible with Changes
DIY offers flexibility that pre-made stationery doesn’t. If your guest list changes or you decide to tweak your wedding theme, you can adjust your designs without extra costs or delays. This adaptability is invaluable when handling last-minute wedding changes.
How to Make DIY Wedding Invitations and Stationery Look Professional
Creating beautiful, polished DIY wedding stationery is easier than you think. Follow these tips to ensure your designs look professional and impress your guests.
1. Invest in High-Quality Materials
Use premium card, textured paper, and high-quality adhesives to achieve a luxurious look. Don’t skimp on materials—better supplies make all the difference in creating professional-looking stationery.
2. Keep Your Design Consistent
Stick to a cohesive design by using the same colour palette, fonts, and decorative elements across all stationery pieces. Consistency creates a polished and visually unified look for your invitations, menus, and save-the-dates.
3. Use the Right Tools
Enhance your designs with tools like die-cutters, embossing machines, or foil stamping kits. For a handmade touch, add hand-painted details, stamps, or elegant calligraphy. These small details elevate your DIY stationery to the next level.
4. Plan Ahead
Start your DIY projects early to avoid last-minute rushes. Give yourself ample time to design, test, and assemble your stationery. Staying organised will make the process smoother and less stressful.
5. Test Before Finalising
Create a prototype of your wedding invitations or stationery before producing everything in bulk. This allows you to adjust the design, test materials, and ensure everything looks as good as you envisioned.
6. Consider Digital Templates
If designing from scratch feels overwhelming, use digital templates as a base. Graphic design software allows you to create polished designs quickly, which you can print and assemble yourself.
Why DIY Wedding Stationery Is Worth It
DIY wedding stationery isn’t just about saving money—it’s an opportunity to create something meaningful and memorable. Every design choice, every hand-tied ribbon, and every handwritten detail is a reflection of your love story. Whether you’re crafting elegant wedding invitations, personalized place cards, or creative save-the-dates, DIY gives you the freedom to create stationery that’s entirely unique.
By taking the DIY route, you’re not just designing paper goods—you’re creating keepsakes that your guests will cherish. The process may take some time and effort, but the result is worth it: customized, beautiful stationery that makes your wedding day truly special.
Ready to get started? Gather your materials, unleash your creativity, and make your wedding stationery a personal and unforgettable part of your big day.